Flashing Behind Siding

Pin On Construction

Siding Transitions Vertical Siding Vertical Siding Exterior House Cladding

13 Simple Vinyl Siding Installation Tips Installing Siding Vinyl Siding Installation Vinyl Siding

Pin On Diy Repairs

13 Simple Vinyl Siding Installation Tips Vinyl Siding Installation Installing Siding Vinyl Siding

Pin On Flashing

Slip the siding up and around the door.
Flashing behind siding.

Pin On Roof

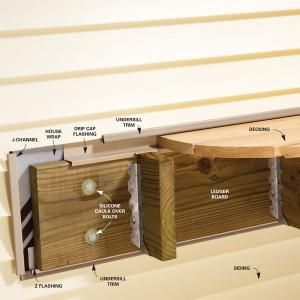
Deck Ledger Board Installation Google Search Removing Vinyl Siding Vinyl Siding Vinyl Siding Cost

Cedar Siding General Installation Tips Real Cedar Cedar Siding Installing Siding Installing Cedar Siding

Pin On Info With Some How To S

Pin On Backyard

Pin On Roof

Pin On Siding

Deck Ledgers Best Practices Manual Hammer Hand Pacific Nw Builder Diy Deck Building A Deck Deck Design

Pin On Exterior Projects

Pin On Window Trim Exterior

Pin On Deck

Pin On For The Home

Pin On For The Home

Pin On Excellent Exteriors

Pin On Roof Tie In

Siding Replacement Wars James Hardie Vs Lp Smartside In A Battle For Contractors Builders And You In 2020 Hardie Replacing Siding Siding

Pin On Diy Outdoor Projects

Pin On Skylite
Https Encrypted Tbn0 Gstatic Com Images Q Tbn 3aand9gcthk Radxm Tk9mzfeyuebbcb2ixkn Qb9tqeefvpnyzzhcgtfz Usqp Cau

Pin On Gutters
Pin On Repair Vinyl Siding And Gutters

Pin On Sell Sell Sell

Pin On Hdc Roofing Construction

Pin On Architecture Products
Source : pinterest.com
